Simple Audio Player
Hardware Required
Arduino Due Board
8-ohm speaker or headphones
Arduino shield with an SD card with cs CS 4 (like the Ethernet shield)
Componets to build an external audio amplifier
LM386 (low power audio amplifier)
10 kohm potentiometer
10 ohm resistor
2 x 10 µF capacitor
0.05 µF (or 0.1 µF) capacitor
250 µF capacitor
The Circuit
The shield sits on top of the Due with a micro-SD card in the slot. A .wav file named "test.wav" is in the card's root directory. For a simple test you can attach a pair of headphones directly to ground and DAC0, respecting the polarity.
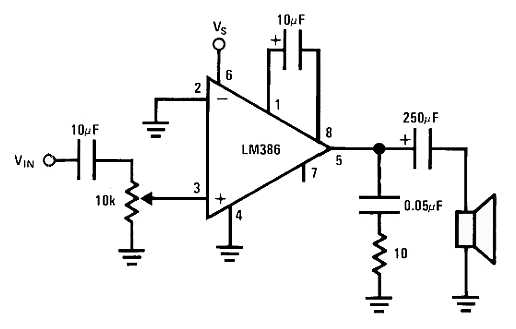
To connect a speaker to the board you have add an amplification circuit connected between the DAC0 pin and the speaker. The amplification circuit will increase the volume of the speaker. There are many audio amplifiers available, one of the most common is the LM386. The following scheme shows how to build the circuit using the LM386 and a bunch of components. You can supply the LM386 connecting the Vs pin with different voltages sources, like for example the +5 V present on the 5V pin of the Arduino Due or an external 9V battery. The gain of the amplifier is given by the capacitor connected to pin 1 and 8 of the LM386. With the 10 µF capacitor the gain is set to 200, without the capacitor the gain is 50. With the potentiometer you can control the volume of the amplifier. Warning: do not connect the speaker directly to the pins of the Arduino Due.

LM386 electronic schematic

LM386 mounting on breadboard
Audio File
The Audio file to store on the SD card must be in the .wav format with 44100 Hz, 16-bit stereo quality.
Code
/*

  Simple Audio Player

 Demonstrates the use of the Audio library for the Arduino Due

 Hardware required :

 * Arduino shield with a SD card on CS4

 * A sound file named "test.wav" in the root directory of the SD card

 * An audio amplifier to connect to the DAC0 and ground

 * A speaker to connect to the audio amplifier

 Original by Massimo Banzi September 20, 2012

 Modified by Scott Fitzgerald October 19, 2012

 Modified by Arturo Guadalupi December 18, 2015

 This example code is in the public domain

 http://www.arduino.cc/en/Tutorial/SimpleAudioPlayer

*/

#include <SD.h>
#include <SPI.h>
#include <Audio.h>

void setup() {

  // debug output at 9600 baud

  Serial.begin(9600);

  // setup SD-card

  Serial.print("Initializing SD card...");

  if (!SD.begin(4)) {

    Serial.println(" failed!");

    while(true);

  }

  Serial.println(" done.");

  // hi-speed SPI transfers

  // 44100kHz stereo => 88200 sample rate

  // 100 mSec of prebuffering.

  Audio.begin(88200, 100);
}

void loop() {

  int count = 0;

  // open wave file from sdcard

  File myFile = SD.open("test.wav");

  if (!myFile) {

    // if the file didn't open, print an error and stop

    Serial.println("error opening test.wav");

    while (true);

  }

  const int S = 1024; // Number of samples to read in block

  short buffer[S];

  Serial.print("Playing");

  // until the file is not finished

  while (myFile.available()) {

    // read from the file into buffer

    myFile.read(buffer, sizeof(buffer));

    // Prepare samples

    int volume = 1024;

    Audio.prepare(buffer, S, volume);

    // Feed samples to audio

    Audio.write(buffer, S);

    // Every 100 block print a '.'

    count++;

    if (count == 100) {

      Serial.print(".");

      count = 0;

    }

  }

  myFile.close();

  Serial.println("End of file. Thank you for listening!");

  while (true) ;
}
See also
Audio library