Getting Started with the MKR ENV Shield
The MKR ENV Shield allows a MKR board to acquire environmental data collected by an array of sensors. These sensors are of the latest generation and measure atmospheric pressure, temperature, humidity, UVa intensity, UVb intensity, UV Index and light intensity (in LUX). To help you build projects with locally stored data, this shield has a microSD slot.
This shield has all the sensors on one side and should be kept on top of any pile of shields, otherwise it won't be able to measure properly all the values related to light.
Hardware

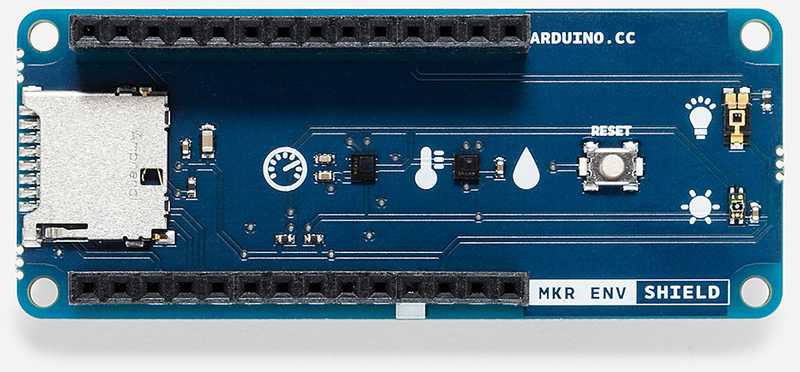
The first sensor on the left is an LPS22HB and measures atmospheric pressure; the next one is an HTS221 and measures temperature and humidity, next is the reset button that has been replicated on the shield to allow you to reset the MKR board below. The top sensor on the right is a TEMT6000 and measures the Lux of the ambient. The last sensor, just below the Lux, is a VEML6075 and measures the two UV wavelenghts named as A and B. This last sensor is also capable of producing the UV Index through some calculations performed by our MKRENV library. On the left of the board the metallic square is the slot for a microSD.
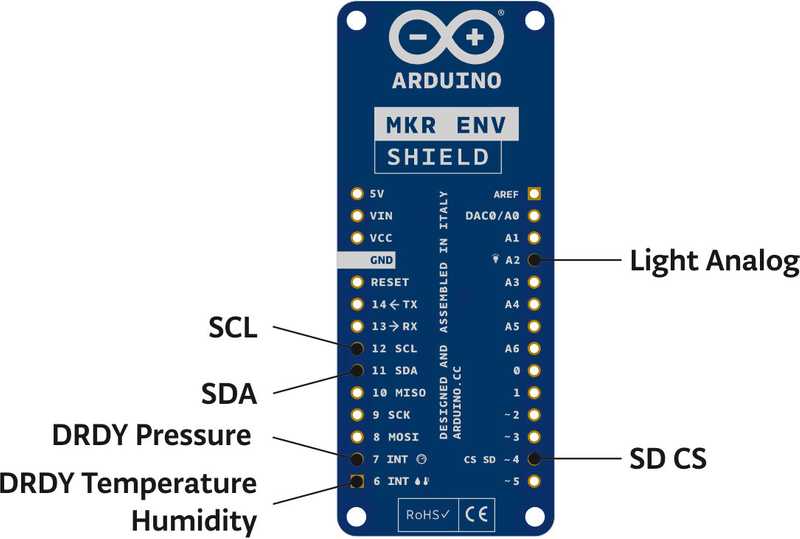
The interfaces used by this shield are i2c, analog and SPI. i2c is used by pressure, temperature, humidity and UV; the interface is the usual 12 (SCL) and 11 (SDA) . Analog is for the Lux ambient light sensor and is connected to A2. The SD card relies on SPI interface, therefore it uses 8 (MOSI), 9 (SCK) and 10 (MISO). Other pins used by the shield are the SD CS on D4 to select the microSD, HTS221DataReaDY on pin D6 and LPS22HBDataReaDY on pin D7.

Software
This shield uses sensors that communicate with the board using the i2c protocol and a two wire interface. Only the Lux sensor is analog, nevertheless we have prepared a library, Arduino_MKRENV, that takes care of all the protocols and parameters, allowing you to read al the values from all the sensors with a simple set of APIs. You need to download it using our Library Manager.
Please refer to Arduino_MKRENV library to get full details about the available functions.
Tutorials
Now that you have a basic knowledge of the shield, you may find inspiration in our Project Hub tutorial platform.
Example
Here is a sketch that reads all the sensors each second and prints out type and value of the parameter sampled from the environment
/*
MKR ENV Shield - Read Sensors
This example reads the sensors on-board the MKR ENV shield
and prints them to the Serial Monitor once a second.
The circuit:
- Arduino MKR board
- Arduino MKR ENV Shield attached
This example code is in the public domain.
*/
#include <Arduino_MKRENV.h>
void setup() {
Serial.begin(9600);
while (!Serial);
if (!ENV.begin()) {
Serial.println("Failed to initialize MKR ENV shield!");
while (1);
}
}
void loop() {
// read all the sensor values
float temperature = ENV.readTemperature();
float humidity = ENV.readHumidity();
float pressure = ENV.readPressure();
float illuminance = ENV.readIlluminance();
float uva = ENV.readUVA();
float uvb = ENV.readUVB();
float uvIndex = ENV.readUVIndex();
// print each of the sensor values
Serial.print("Temperature = ");
Serial.print(temperature);
Serial.println(" °C");
Serial.print("Humidity = ");
Serial.print(humidity);
Serial.println(" %");
Serial.print("Pressure = ");
Serial.print(pressure);
Serial.println(" kPa");
Serial.print("Illuminance = ");
Serial.print(illuminance);
Serial.println(" lx");
Serial.print("UVA = ");
Serial.println(uva);
Serial.print("UVB = ");
Serial.println(uvb);
Serial.print("UV Index = ");
Serial.println(uvIndex);
// print an empty line
Serial.println();
// wait 1 second to print again
delay(1000);
}The text of the Arduino getting started guide is licensed under a Creative Commons Attribution-ShareAlike 3.0 License. Code samples in the guide are released into the public domain.